Monday 28 November 2016

Kingdom Death Stone Effect Tutorial


I was asked several months back to undertake a commission for Kingdom Death, to paint the entire contents of their boxed game, Monster.
Monster contains over 40 miniatures, including some pretty big beasts, and I had a pretty tight deadline, as they needed them done in time for Gencon.
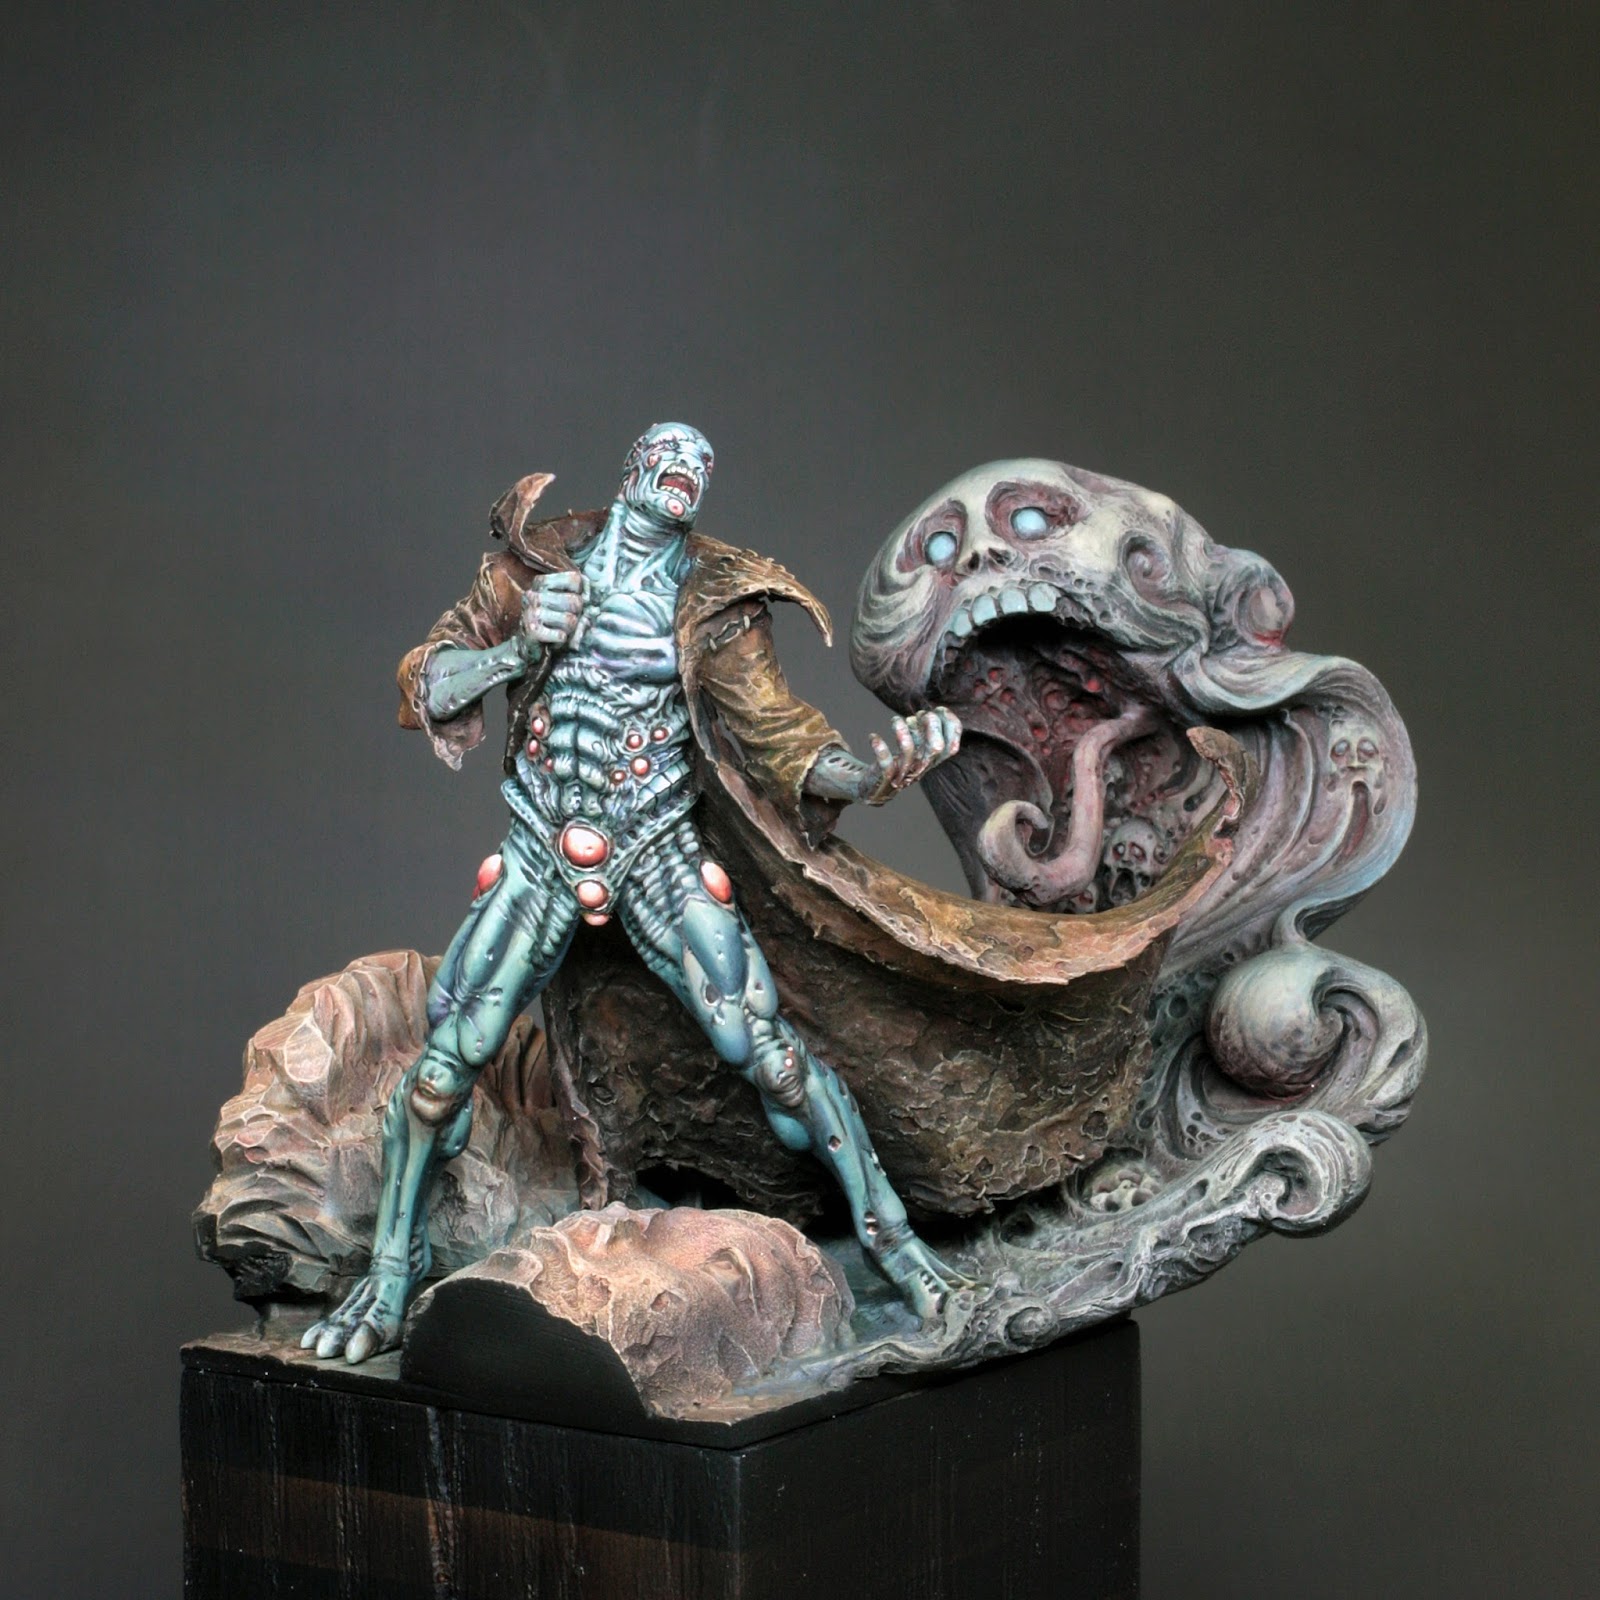
Fortunately, however, I didn't need to paint them as individuals; quite the opposite in fact, as they were needed to resemble slightly crumbling statues, reminiscent of some of the artwork found on the "Innovation" cards in the game (and in a few places in the rulebook).
I was provided with a guide by one of Team KD's sculptors, Thomas David, and I was off! :)

I managed to get the full set done within the time required, and they debuted at Gencon 2016.

Now, this might ordinarily be the end of the story, but Kingdom Death have run a Kickstarter to unfeasibly huge success, and the miniatures that I painted feature heavily in the campaign video and on the front page of the campaign too.
To this end, a great many of the backers have asked about how the stone look was done - and indeed many theorised that the miniature moulds had been deliberately "scarred" to create the cracked stone look, which I can reveal to no great surprise that they are just a really old painting trick known as "Trompe-l'œil".

So, without further ado, here is how the look was acheived. This process is ideal for block painting of at least 4-8 survivors or 2-3 monsters at once, so that you don't have to wait for paint to dry. I managed to paint this one model in less than an hour, so no great investment to get your minis looking good ready for a game!

1) Prime in black.


I used an airbrush, but a black spray primer would be fine.

2) Basecoat in a grey-brown


I used an airbrush to cut down the time aspect, but brushing on would be equally fine.
The paints used at this stage were GW Zandri Dust and P3 Ironhull grey at 50/50 ratio. Any stony grey could work, so long as it has a bit of brown or khaki to stop it looking too monochrome.

3) Highlight by adding ivory/cream to the mix


Again I'm still using an airbrush, spraying on from diagonally above.
I added about 50% P3 Menoth white base to the mix in 3 stages - each stage adding equal Menoth to the amount of paint in the airbrush. In reality it's a couple of drops of paint each time.
Each stage I increased the angle until I was spraying directly down on the mini's head.

4) Drybrush with a light tone


It is fairly important to use a quite soft drybrush, and do this sparingly. I used GW Pallid Wych Flesh, which has a really pale, very slightly pink stone colour, but again, anything along these lines will work fine.

5) Wash


I used GW Agrax Earthshade with a little GW drakenhof nightshade - a dirty brown and dark navy wash - and diluted it about 50/50 with water. I then applied this liberally to the model.
Once I had covered the mini, I then blotted my brush and used it to pick up the puddles of wash on the mini. This avoids staining rings where I don't want them, but allows me to leave a little more here and there, and indeed encourage a little bit of streaking where I imagine dirt running down the model that is now beginning to resemble a statue.

6) Cracks


Taking some black paint and mixing it with my wash I quickly, but CAREFULLY, painted on some cracks using the tip for a good brush with a fine point. I allowed a little natural shake to my hands to create lines that weren't straight, and it's easy to find real world references of cracked stone to create the pattern if you're not sure.


The final touch is to highlight the BOTTOM edge of the cracks with a near white colour. I added white paint to my final highlight mix - but equally a little white mixed with the drybrush colour will work too.
The important thing is to be careful to follow the previous line, don't make the white thicker than the black, and if your black lines are a little thick, paint slightly onto them, to make them smaller.

Aside from using this white to just lightly edge highlight a couple of spots, that is it. Done.


The cracks are the only part that require any expertise with a brush, and really aren't necessary, they're just an effect to tie into the art.

I hope that you find this helpful, and who knows what the rest of this campaign may unveil.

Happy painting! :)

Scott

Thursday 16 June 2016

Gallery Round Up

I think that I may stop putting entries onto Coolminiornot and P&P in the future. CMON in particular has really lost a lot of (sensible) voting traffic, and unless you paint a certain brand of model then you are unlikely to get many votes at all.

It's no great loss, as I don't have a burning desire to either be or be acknowledged as "teh best painter evar", so rankings are kind of arbitrary, but it is a shame that a small group within the community that are negative in their use of these sites (almost all CMON I should add) get to take over.

For what it's worth I've put up final photos of Atalanta from JoeK minis...


Views/Voting Link - http://www.coolminiornot.com/399687

Then I also added the recently completed Lion Knight...


Link - http://www.coolminiornot.com/399688

Plus Blanche from Hasslefree that I did back in April...


Link - http://www.coolminiornot.com/399689

And the various protagonists from the Berserker at the Bridge diorama...

Link - http://www.coolminiornot.com/399691


Link - http://www.coolminiornot.com/399692


Link - http://www.coolminiornot.com/399693


Link - http://www.coolminiornot.com/399694

Each of the links provide additional views of the models shown above, and if you fancy popping a vote/comment on, then that's nice of you.

For the future I think that I shall just show the models here and on Facebook and see what happens from there. I shall also look at creating a gallery page on here for future reference too.

But for now, I hope that you do take a look, and I'm off to watch the football... ;-P

Seeya.

Wednesday 1 June 2016

Fix up, look sharp

It feels like forever since I've had something that I feel is "worthy" of a full blog post, especially as the last post was about tidying up the desk. However, I'm happy to say that I have finally completed what I feel is a display level piece, and better still, it is a gift for a friend who will hopefully like and care for it better than I am likely to if left in my own possession! lol
Seriously, some days I swear that there is more painted super glue than resin in my cabinet some days..!

I have also carried out enough of a purge that there are just two part painted pieces sat on the desk right now. With enough effort I could have a completely clear space by the end of next week. The joy of a clean slate... *sigh*

I also had a trip to the storage solution Mecca that is Ikea over the bank holiday weekend, and now I have tidy spaces where paint and various other fluids once stood, and easily accessible/portable boxes for said paints/fluids.

Soon it will be time to make a mess again, no doubt... ^_^

So, the project that I've done? Well, it's a return to Kingdom Death, and this time it's the big beastie that is the "Lion Knight 1st". In the write up it is some kind of failed experiment that wanders a labyrinth in the KD world in anguish, somehow out of sync with time and with only some wailing smoke for company. In short, he's not a happy chappy!
As a sculpt he's a mixture of challenging textures, with loads and loads of fine details. A really really strong piece by Thomas David. I don't know why I chose the desaturated teal for the "skin" other than I wanted it to look like some kind of exoskeleton in a Giger-esque alien type of way. Also I had already decided to go with a ragged leathery coat, so the contrast was sort of obvious.

Anyway, pics...


So, there we are. :)

I hope to have the other 2 pieces up soon, and then I'm likely to be working a commission and preparing a couple of pieces for Euro in September, so hopefully I'll have more pretty pics here or on the Facebook page - https://www.facebook.com/theblackhandsblog/

Until then. I hope that you enjoy :)

Friday 29 April 2016

Everywhere and Nowhere!

I'm all over the place at the moment...

In my work life there's absolutely loads going on, and at home we're gearing up for our (not so) little one's 4th birthday, plus starting the preparations for him starting school in September.

So, my hobby stuff usually provides a bit of quiet of an evening. However, just lately I feel like I'm flitting around and not quite following my normal pattern of working, which is to take a piece from start to finish and then move on. Instead I'm prepping pieces, priming others, experimenting with colour on others, painting bases, and tweaking another.
I'm certain that multi-tasking like this is less efficient for me because I'm not getting into the work flow that allows me to concentrate and focus. I also think that it will be to my detriment in terms of quality IF I don't get it under control shortly. I have a short list of commission bits in the pipeline, of which I have another two pieces for Paranoid Miniatures' Mythos Kickstarter to do. Pics will follow there shortly.
After the current list I think that I am going to have a little break from commissions and just do my thing for a few months. I have plans to work on a few slightly larger scale pieces, but I also have a lot of half formed ideas that I need to work through too.

So, what have I been up to that bothers me so much?

Well, first I received a couple of big stone faces designed to complement KD:Monster a little while ago from Jun Chu Minis (These are being produced under permission from KD towers by the way). I said that I would get one painted for Jun to put on the site and so on, so this is my effort...


I'm really not used to working on terrain beyond the odd plinth, so this was an interesting challenge. I really like the sculpt and it was good fun to play with some colour contrasts on what is essentially just stone. If you're a KD player, the face has been done in such a way that the face can easily be used in the game - I have done so - and your survivors will stand on it quite nicely.
I have a second one to do for myself, which I originally intended for the game. However, I have just recently thought that it might make for a nice collective base for the 2nd set of KD pinups... We'll see ;)

Next, I've been working on the alternative (female) sculpt for Infamy's Tesla. She is finished and based, but now that she is on the base, I think that it looks under populated. So, I think that there will be some additional flora and fauna to add. However, this is her up to this point...


She's ever so small, in fact James at Infamy has recent said that he plans to run a 54mm version of her, which would be helpful because some of the details, like the clock on her chest, are almost invisible at this scale. That said, she's still a really nice sculpt by Joaquin Palacios and I've enjoyed doing the various textures, especially the various leather types that I wanted to look distinct from each other - hat, jacket, straps, boots, holster.
The walls/pavement scenery are from MDP by the way. I've had it for a couple of years now, and just not got around to using. Like I said above though, I need to add a bit more character to the setting, so I'll have a little think on that...

Next. JoeK's Atalanta. I've done the base. Next will be the model herself (after the Paranoid pieces are complete)...


Not a lot more to add on this one. Again it's an old base that I've had sat in the drawer for a while. She's the right theme for the base. Job done! ^_^

Finally. The KD Lion Knight (1st). I've not progressed this much other than doing the basic stone work on the base, but I'm also playing with the colour tones that I plan to use when I get down to painting it properly...


 It's quite funny that it looks like a kind of primary colour triad of red/blue/yellow. I very much doubt that it will be anywhere near as "simple" as that when I get to painting, but still, it's a bit of fun.

OK, that's me up to date. Maybe I'll get a little bit of painting in this weekend, but being a public holiday on Monday, I suspect that there'll be lots of family time, so we'll see.

Until next time,

Scott ^_^

Monday 18 April 2016

Salute Winners Mini Post 2016


So, Salute 2016 is over and this year I think that there was a much warmer feel about the painting competition, especially as the Warlords decided to ask 2 previous best of show winners - Pete Bell and Conrad Mynett - to guest judge with Lawrence and the Warlord guys on the day.

I believe that a good day of trading was had by most, and certainly there was no shortage of people in the hall throughout the day. I personally got asked at the last minute to help on the Studio McVey stand with the man, the legend, Mike himself, and the Swedish wunderkind that is Robert "Rogland" Carlsson.

Speaking of the Swedish, it was a great day for them, as Robert and his compatriot Stefan Johnsson took away 7 first and second awards between them. 
I personally only entered once and picked up a finalist pin, which was expected, especially as I had not prepared anything with competition in mind this year.

Chatting with Mike is always enlightening, and the steady stream of fans and contemporaries that came over just to say hi shows how well loved he still is, and probably always will be. Robert was similarly good company, and it was great to see his work up close and chat some about his approach to painting.

Other than that, I handed over a few painted pieces to Hasslefree Minis for their personal/show collection and received an armful of jerky in return! And Mike gave me a full set of the beasties from 7 Sins that are truly, fantastically disturbing, coming largely from the hands of possibly my favourite sculptor, Jacques-Alexandre Gillois (JAG), whoi incidentally I also had a good chat with too - Kingdom Death fans, watch out! ^_^

So, without further ado, here are this year's winners, in no particular order...


And the Best of Show was this piece "The Hunt" from Stefan "Skelettet S" Johnsson

Enjoy (and share if you like too!)

Until next year,

Scott :)